Sunday, August 22, 2010

Mexican Flan or Caramel Custard

Whenever we have a Mexican meal with guests I always make flan for dessert. We rarely have any left-overs - Dawson inhaling what's left. This time Aaron and Dawson divided what was left.

FLAN
6 eggs
3 C milk
1/2 C sugar
1 tsp vanilla
Mix this all together for pouring in the pan

Caramel sugar for coating the pan
1/2 C sugar melted in a skillet
Stir this frequently. I like using a wooden spatula. You want it a deep amber color, but not burnt. Immediately pour this into the greased pan.

I like using a bundt pan for flan (as you can see, I didn't this time. My recipe amount did not fit this pan. I have to get a new pan). Pregrease it. Heat the oven to 325 degrees. Find a pan the flan pan will fit in and put about 1/2" hot water in it. Pour in the caramelized sugar, it doesn't need to coat the pan, cooking will distribute it. Pour in the flan ingredients. Bake about 1 hour, till a knife inserted in center comes out clean. Remove the pan from the hot water and set on rack to cool. Then refrigerate until cold. I usually get this done in the morning, so I don't have to think about it with meal prep.

When ready to serve, loosen the edges with the tip of a knife. Cover the pan with a large serving plate and invert. It usually releases right away, or will in a bit.

I'd heard that if you make a good dessert, and have a good appetizer, your meal will be a success - like focus on those first.

STUFFED GRILLED POBLANOS!

We did Mexican for company Friday. We always crockpot some chuck and chicken for burritos, having shredded lettuce (we did chinese cabbage this time), chopped tomatoes, sour cream, and grated cheese. I always do a guacomole for chips, and salsa, while everyone's standing around helping get things together for supper, and visiting. I usually do a Flan for dessert, which I'm going to post too. But the specialty is stuffed grilled poblano chilies!

STUFFED GRILLED POBLANOS
6-7 Poblano chilies - these look like pointed bell peppers, though usually a darker green. Every store labels them different: like ancho (which is really dried poblanos) or pasillo ... So that's why I'm telling you what they look like.

Cut a slit down one side and remove the seeds, wash and drain. Spoon the filling in them. I stuff the filling, shoving it well in so it doesn't easily come out when cooking (it does, but it's worse if you don't pack the filling).

Filling:
8 oz grated cheese
1 15oz drained canned beans - I usually use black soy beans since they are higher fiber and protein. My next choice would be black beans; then pinto (which I've not used).
1/3 cup raisins
1/4 cup salsa
2 tsp chili powder

Sarah and her artistic looking plate
I soak mesquite wood chips for at least an hour and have a chip pan I insert under the grill grate on one side. I leave this side on high for the entire cooking time. Before I had a nice grill, I used to put the drained, soaked chips sealed in heavy-duty foil with holes poked in it for smoke escape.

On a preheated grill place the stuffed peppers away from the wood chip side on high. Turn the burners under the chilies to mdium - near the end I often turn these burners off, still leaving the chip side on high, for good smoke flavoring. Cook with the lid closed. I grill them about a half-hour. Turn them over half way through, but be conscious of the slit opening so you don't dump all the filling out. They should get some dark blistering on both sides. Remove to a serving tray and cover with foil till you're ready to eat.

Annie and Dawson taking bites
Cream Sauce
I don't think the recipe called for a sauce, but from my Rick Bayless Mexican cookbooks, I often make a sauce to serve the chilies with. He has you chopping onion, tomato, jalepeno and what-not and add to cooking cream. My simple version is to heat cream and simmer down a bit, to thicken, adding some salsa.

Authentic Mexican cooking for stuffing all sorts of chiles, burritos and enchiladas often adds some chopped dried fruits. Not a lot, but to have an occasional bite of a bit of sweet is good.

Travis took the pictures. Sarah's sister Annie and her husband Aaron were visiting from Oregon. Aaron and Monte in the pic below are looking at the kitchen garden. Travis and Sarah's dog Bea is on the grass.


Rhubarb Custard Pie

Having company this past week, I made a family favorite. It's in my cookbook. When I make something new, I often pull out several cookbooks to compare recipes, then pick and choose. This requires "knowing your ingredients" - which is a chapter in the Joy of Cooking cookbook.

RHUBARB CUSTARD PIE
First, I freeze the 1/2" cut-up rhubarb from our garden in a heaping quart measuring bowl, so it's about 5 cups of rhubarb.

PIE CRUST
(for 2+ crusts)
2 C flour
3/4 C butter
pinch of salt
about 1/4 C water (depends on flour moisture)

I use my ground white whole wheat or pastry wheat I've always got in the freezer in Ziplock bags. Since I had kamut in there too, this pie is half wheat and half kamut. I always use butter, unsalted if I have it. I've used lard or the newer organic shortening which is palm oil. I never use shortening. It's vegetable oil heated so hot it's next step would be plastic. Our body does not know how to break this fat down - it's what's now called trans-fat. And labels that have partially hydrogenated anything I never get. It's the word "partial" that's killing people. It races around our body looking for a home and latches onto cells, hurting them, and today we have way more cancer, diabetes, and heart disease than ever.

Cut the flour, salt, and butter together till fine crumble. Mix in water till mixture forms a ball. It shouldn't be sticky. I use a food processor all the time now for the preliminary processing of the dough, unless I'm making a larger amount, then I use the whips in my regular Bosch bowl, putting the cut-up butter in first. But I always finish up both processes by hand with a pastry blender. Mixing the final bits of water in is when we often over-process pie dough, which makes it tough. Then I flatten the dough in plastic wrap and refrigerate it while putting together the filling. Keeping the dough chilled is another key to a flaky crust.

Filling -
the 5 cups cut up fresh or frozen rhubarb put in pie first.
Mix together -
3 eggs
2 Tb whole wheat flour
2 Tb tapioca
1/3 C honey
1 C sugar (we've been practically eliminating sugar, so I'm going to cut this back next time cuz it's too sweet for us now)
1/2-1 tsp orange peel
pinch of salt

Pour the filling over the rhubarb and cover with a top crust and make steam vents. I usually sprinkle it with a touch of cinnamon. Bake for 10 minutes at 400, then lower to 350 and continue baking another 45-60 minutes. We like pie crust well-browned and giving the bottom crust a chance to thoroughly cook too.

When I put on the top crust I knife off the excess dough before crimping the edges.

I roll out this excess dough for little cinnamon tarts. Sometimes I'll put pats of butter then sprinkle on lots of cinnamon. The very little bit of sugar added on these is Sucanat. It can't really be called a sugar, cuz by its very nature, sugar is processed. Sucanat is plain dehydrated sugar cane.

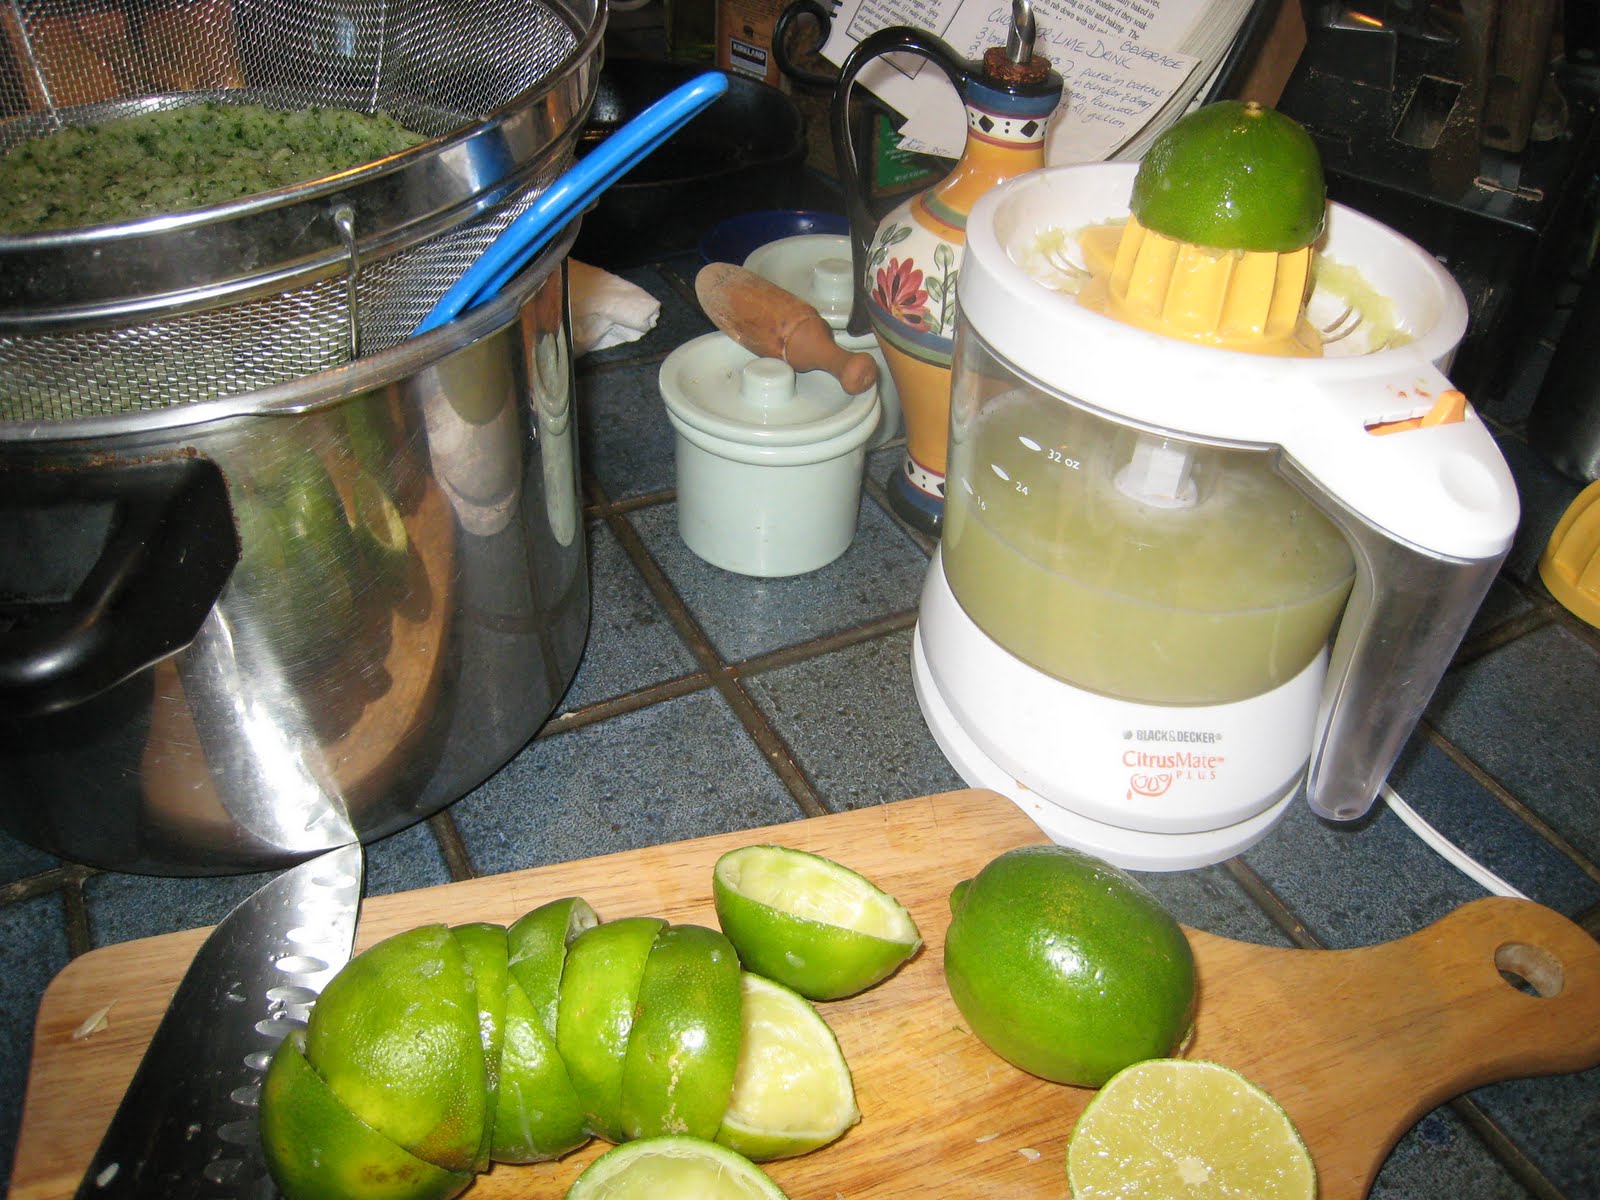
Cucumber Lime Drink

Several summers ago Dawson and me craved a cucumber lime beverage we'd get when walking around the Farmer's Market, so we tried to make it at home. My guess is the lady making it at the market just used a reconstituted frozen limeade and added pureed and strained cucumbers, and I'm going to have to try that. But here's the recipe I created ...

CUCUMBER LIME DRINK
3 long cucumbers
1 1/2 - 2 C sugar (depending on your sweet tooth)
2 C fresh squeezed limes (8)
enough water to make a gallon

I put the sugar in a large pan with a strainer above, then puree the cucumbers in 2 batches in my blender, each batch with 2C of water. I pour these in the strainer and then stir the pan mixture till the sugar dissolves. Then add the lime juice and add water, pouring through the cucumber in the strainer till it equals a gallon.

I do this process when I make rhubarb-ade (posted earlier). But maybe it would be easier to just mix everything in a large bowl, stirring awhile, both to dissolve the sugar and letting the flavors mingle more, then strain the whole mixture, pouring off into jars to refrigerate.

We had a series of guests this last week, and everyone really liked this. Everyone always does. I don't know if I know of anyone not liking this nor the rhubarb-ade.

Tuesday, August 17, 2010

Basil Pesto and Uses

Last night I wanted to make something with pesto. I'd just made up a bunch of the pesto recipe below and froze. Tho not typically combined with pesto recipes I've found, I wanted to add chicken, so had a bone-in breast boiling, to create some broth.

In my Hearth & Home cookbook I have this pesto recipe and mention making a meal of it with adding potatoes in the pasta boiling water, drain the potatoes and pasta, and toss with pesto. The actual dish is called Trenette Al Pesto. You boil several quarts of salted water, adding 3 medium potatoes, peeled and sliced not more than 1/4" thick. I always cut the potatoes like french fries and boil them about 5-10 minutes before adding 1# of linguine or fettuccine pasta. And actually, I boil chicken first and then cook the potatoes and pasta in the chicken broth, debone and shred the chicken, and toss it in with the pesto. The recipe doesn't call for broth or chicken, I just do it.

Traditionally, pesto is made with an Italian basil. Non-Italian variations are made with other herbs and greens, and some have olives and sun-dried tomatoes. Differing 'nuts' can be used too: like walnuts or almonds. They could be toasted. Pesto is originally made by pounding the basil and mixing in a mortar and pestle. Cook's Illustrated Complete book of Pasta and Noodles has you first put the basil in a sealable plastic bag and pound with the flat side of a meat-pounder to bruise the leaves before processing in a food processor.

BASIL PESTO
3 C basil leaves
1/4 C pine nuts
1/2 C good tasting olive oil
3 lg garlic cloves
Process this in a food processor till grainy.
Fold in 1/2 C grated parmesan cheese.

When freezing pesto, I don't add the parmesan till I'm using it in a recipe. This time, since I quickly decided to clip off most of my garden basil, I made it without the garlic too, since I didn't have enough on hand. So my large ziplock bags, full of smaller bags of the recipe, are labeled "without garlic and parmesan", so I know to add it later.

There's differing basils, and not all make good pesto. I grow a large leaf Italian basil called "Genovese". Basil needs a lot of pinching off of the tops for branching and not getting leggy. So I cut back the basils pretty close to the ground, leaving some leaves and will get more before they're frosted out.

Another recipe using pesto, Rigatoni alla Fornaia, sautes onion, garlic and tomatoes, cooking down with some white wine, then adding a few tablespoons each of pesto and ricotta, tossing it all together with cooked pasta.

Last night I wanted homemade pasta. And I found another recipe similar to the potato one above with added green beans. I have a hand-cranked pasta machine. Though you can make eggless pasta, I prefer it with eggs. I always feel having some protein helps in better assimilation of carbohydrates - so not as much of a gaining weight producing food. I use my fresh ground (bagged in the freezer) whole wheat flour.

PASTA
3 large eggs, beaten
2 C flour
Have it all at room temp. Pulse in a food processor with the metal blade until dough forms a rough ball. If it seems too dry (flours differ, and too, humidity makes a difference) add water 1/2 tsp at a time; or if too sticky, add some flour 1 Tb at a time. Turn out the dough and knead a few minutes till smooth. Wrap in plastic wrap to relax at least 15 minutes. I divide the dough in 6ths, working with one at a time. Follow directions of the pasta machine, or hand roll it very thin and hand cut. Fresh pasta cooks up in boiling water in just a few minutes. Freeze whatever you don't use.

The recipe I made last night is called  
PENNE WITH GREEN BEANS, POTATOES, AND PESTO
tho I didn't use penne pasta but fettuccine (wider flat pasta than linquine). And I'd been boiling up that chicken breast, I started this post with. They boil the potatoes in separate water and the green beans and pasta together in water. I used the chicken broth, boiling them all in it, starting with the potatoes till almost tender, since the beans and fresh pasta only needed to boil 3-4 minutes. And I tossed in the shredded chicken from the cooled, deboned breasts. Someday I'll post about "umami", the fifth taste. The chicken broth is my umami addition to the recipe.

1# potatoes, slice 1/4" thick
1# green beans, ends cut off and cut in 1/2" lengths
1# pasta
pesto recipe above

Cook as I suggest above, toss together and serve immediately. Should serve 4.

I freeze some pesto in ice cube trays, so the bag has lots of pesto cubes, probably about 2Tb. I LOVE pesto spread on a toasted piece of my homemade bread! I also like to cut tomatoes in half for baking/broiling with pesto on top. I make a pesto pizza, spreading the dough with pesto and adding fresh sliced tomato and mozzarella cheese.

Curr(a)nt Harvest Happenings

I thought I'd post a bit about what's currently happening around here. Karey's kitchen is so amalgamated with Karey's garden and greenhouse. On my calender this month I've recorded that I've frozen snap peas, sliced zucchini, currants, raspberries, kale, and pesto. We'll soon be cutting grape clusters in the greenhouse and bagging the whole clusters for the freezer - tiny grape popsicles! And there's so many tomatoes trying their darnedest to ripen, but our nights are going down to 40 degrees now, and that slows the process. Lots of green beans are coming too. I need to go check out our old garden.

We actually started our old garden before we built our house 25 years ago. As I said in a rhubarb post, rhubarb and chokecherries were already here. There's evidence of an old homestead. In fact, Monte's writing a book called The Secret Of Singing Springs incorporating some historic stories fictionally intertwined with some of our own stories. One historic occurrence in the vicinity is with Jessie James. Our old garden has a 6 foot fence to keep elk out. If we could keep voles and pocket gophers out it would be almost perfect. We put an old sink in the garden which adds to the atmosphere being next to the woods of pine, fir, blue spruce and aspen. There's springs in that thar woods - thus the "singing springs" (we sing ... and I guess the breeze thru the trees sings - we named the road we live on Singing Springs Ln).


That garden used to be our only garden, but now I've planted a lot of fruiting bushes and small trees: native plums, saskatchewan bred cherries and blueberries, black and red currants, and gooseberries. Besides the chokecherries on the back fence and rhubarb, there's asparagus and raspberries. Next spring I'm going to plant more strawberries. Monte's tending this garden. He's weeding it and keeping all the cabbage family watered: broccoli, cauliflower, brussel sprouts, rutabaga, cabbage, and then leeks - are what we planted there this year. One year I froze 30 pounds of broccoli. This year will probably be one of those years! I planted some fruit bearing siberian mountain ash trees, but don't know yet if the voles killed them.

The currants we just harvested and froze were from one bush, an old bush. The newer planted ones aren't bearing much yet, and I've just been eating them. They're sure tedious to harvest. I wrote on my calendar that I froze 13 cups, having first spread them on cookie trays to freeze, then bag them up. We like them in homemade ice cream, and I have homemade yogurt every morning with frozen/fresh fruit, and dried sprouted flax seed. Wow, when the others do start bearing, we'll have a lot. Maybe I'll consider drying some. Dry or frozen currants could be used in muffins and quick breads. Currant pie? Hmmmm...

I grow and harvest kale for its nutritive value, not that I love it - like vitamin C and calcium, for example. We have it in all our salads, including spinach, beet greens, and occasionally mustard greens. I just froze the red tinged kale, next I'll be doing the curly kale, then tuscan. I'll be freezing spinach pretty soon too. Greens, as do most veggies, need to be blanched a few minutes, before freezing. It's been tested, and they retain more vitamins when blanched first. Monte likes to pull a small bag from the freezer, chop it up, saute, and add parmesan and lemon juice. I'll add it to lasangas and stews.

This year in my closer kitchen garden I planted five varieties of beans. The four pole beans are planted together, for their varying colors, climbing the bamboo teepees. Scarlet runner beans have bright red flowers and larger beans - I'm trying to pick these before they get large. Then there's two purple varieties: the Hyacinth bean has purple vines and deep purple flowers, the other has pale violet flowers. Neither are purple bean pods. Then I planted some bush beans because they bear earlier than pole beans. But the Scarlet Runner beans are a close second. Then there's these Fortex pole beans I've never grown before. They sure are skinny. It's all so fun!

I made spaces in my kitchen garden, pulling out older greens and volunteers, and harvesting things so I could plant more salad stuff seeds to carry us into fall, and by covering with floating row covers (a white cloth looking like sewing interfacing) these greens might grow into winter. I did some stripping of tomato branches and leaves too - to allow more sun to get at the plant base for more warmth, and to force plants to focus on ripening tomatoes.

We've got these volunteer squash. I pulled out most, but some were growing where it was ok to let them do their volunteer thing ... But what are they?! They're starting to turn from green to yellow ... and maybe orange ... are they pumpkins? We shall see ...

Monday, August 16, 2010

Pan-Roasting Halibut; & the Humble Sardine

This recipe comes from Cook's Illustrated 2002 book. Yes, book. I have every Cook's Illustrated Magazine published, but not as magazines. I wait till the end of each year's bound editions come out. It's easier this way. They are all indexed, thus easier to find things.

I mentioned in my old blog about packing up all my many cookbooks, and they were boxed for a year. We redid our great-room space and the wall of cookbook shelves came out. I also, with Google's ease in finding things, wanted to see if I missed my books. Like when I got my sourdough starter going again I wanted a sourdough pancake recipe. I Googled it and the recipe in my boxed cookbook was the first recipe to come up! BUT my Cook's Illustrated bound books, back to 1993, amongst a few other books, I did not pack up.

I consult Cook's Illustrated and my Rodale Press cookbooks all the time. I still alter the recipes often, but not this fish one. Growing up, I disliked fish. Monte changed that. He's the best fish cooker. We have a favorite fishing stream we'd take kids, cuz just about every cast caught fish. They're mountain trout - not big. But we'd have enough for a meal every time. My step-dad gives us extra fish too. One year Monte and a friend got some whoppers - they were probably pike. We froze one whole and he just kept sawing slices to cook for a meal, till he got to the head and made a fish broth/soup. In Wisconsin Monte goes for walleye, pike and bass (he's going to probably read this and tell me more). And then I pick up wild salmon often.

Cook's Illustrated solved my dislike for halibut. Rarely have I had good halibut (not that I tried it alot). It's a lean fish, so is usually too dry for my taste. This recipe works every time!

PAN-ROASTED HALIBUT
2Tb olive oil
2 Halibut steaks about 1 1/4" thick

(Locally, we don't have a fish market and so far, the best halibut I've found is at Costco. I never buy farmed fish. With all my bought fish, I put salt and sugar in a container, stirring to dilute it with some warm water, add some milk, put the fish in, add water to cover, and let it soak at least 30 minutes. Rinse and cook.)

Preheat oven to 425 degrees with the rack in the middle position. When the oven reaches 425, in a heavy ovenproof skillet that holds the size of fish, heat on high until the oil just begins to smoke.

Sprinkly the fish with salt and pepper. Reduce heat to med-high, swirl pan to distribute the oil, and carefully put in fish to sear without moving them, until spotty brown - about 4 minutes. Off heat flip fish and transfer the pan to the oven. Roast until 140 degrees, flakes when forked - about 9 minutes. I just put my timer on for 9 minutes, cuz it's just the right time every time. These times, of course, are for the certain thickness. Serve immediately with dollop of a flavored butter.

Flavored Butters
I've tried 2 of the suggested 3 and like them both- chipotle or anchovy.
Both use 4 Tb butter, a minced garlic clove, and 1/2 tsp salt (which I used only a pinch of)

The chipotle uses 1 chipotle chile en adobo (once I open a can, I store it in a jar in the refrigerator so I always have it on hand), seeded and minced with 1 tsp of the adobo.
1 tsp honey
1 tsp lime zest
2 tsp minced fresh cilantro


The anchovy one uses one anchovy, minced to a paste (I get anchovies in a little jar I store in the refrigerator)
1 1/2 tsp lemon juice
2 Tb minced fresh parsley


I use less butter, softening it in the microwave a bit, mixing everything.

The 3rd suggestion is not a butter but a cherry tomato-basil vinaigrette I'll have to try.

Speaking of fish, a magazine article spoke about the seafood choices we should be making. Large fish-eating fish like shark and tuna are the most contaminated fish. Tho "troll or pole-caught" in the US or British Columbia albacore tuna is considered an ok green fish. Why? Where caught and size are keys. Alaskan waters are very well managed, and northern Pacific is the choice over the Atlantic. The fish they say we should be eating every week? The humble sardine! It's naturally packed with more omega-3s and vitamin D than just about any other food.

Smaller fish are lower on the food chain, abundant, and fast-reproducing. Thus there's less build up of contaminants and less fishing pressure. Many fish in the herring family are commonly called sardines. We'll open a tin of sardines or herring quite often for a meal. They're great on crackers, bread, and with salads.

Try mixing SMOKED SARDINES with some mint. Toast some bread or baguette slices and serve the sardine mixture on the bread along with a slice of tomato. Maybe some thin sliced onion or some chives.

There's many sites for checking on best fish choices, and apps for phones. Look for Seafood Watch, and The Blue Ocean Institute, and go to eatingwell.com/go/fish.

My cookbooks are unboxed now. Monte built shelves in the garage over the freezers. Tho I still get recipes off the internet, I do like having access to my many cookbooks.

Saturday, August 7, 2010

Quinoa & Buckwheat Salad (or Cereal) with Fruit and Nuts

Yummm... I am eating this salad and loving every bite! I get daily recipe emails from AllRecipes.com. I may not keep all the recipes by adding them to my recipe box at that site, but they give me lots of ideas. I got the idea for this recipe from the email that came in today. I altered it a bit and made a smaller proportion.

QUINOA SALAD with FRUIT and NUTS
They cooked 1 1/2 C quinoa with 1/4 tsp salt and 3 1/2 C water, having been brought to a boil and then simmering covered until tender, about 20-25 minutes. Then allow to cool for 20 minutes.

QUINOA & BUCKWHEAT HOT CEREAL
This reminded me of a hot cereal Monte and me often crave - Quinoa & Buckwheat with yogurt and maple syrup. It's in my Hearth & Home cookbook. Now my understanding of quinoa, besides it being a revived high protein South American grain, is it needs to either be rinsed first or toasted. Quinoa is an acquired taste. It is very unusual. And buckwheat isn't even a grain, but a vegetable, tho it falls in the grain category - probably because it's used as such. For our cereal I toast 1 C Quinoa and 1 C buckwheat, stirring occasionally (you'll hear the quinoa popping) then add a bit of salt and 4 C water, bring to a boil, and then simmer covered, cooking till tender. We store what's left in the fridge for more breakfasts.

BACK to the SALAD
So I basically made the above cereal recipe instead of their suggestion. Their mixture with the below ingredients was said to serve 10. I used 2 C of my cooked cereal for 2 servings, eating as a main dish, rather than a small side (we Americans need to think of veggie side dishes moreso as the main meal with meats as sides - I like to grill marinated meats and slice some of it to add to salads). With their quinoa proportion I'll give you the rest of the salad ingredients and you can mix what amount you want.

-1 bunch green onions, chopped (I used a bunch of chives)
-3/4 C chopped celery
-1/2 C raisins (I used craisins - and probably more)
-1 pinch cayenne pepper
-1 Tb vegetable oil (I used olive oil)
-1 Tb distilled white vinegar (I don't ever use this kind of vinegar for any cooking, only with my textile art when dyeing - I used a mixture of rice and balsamic vinegars)
-2 Tb lemon juice (I used lime, cuz that's what I already had cut. And I used less, using more of this proportion with my vinegars)
-2 Tb sesame oil (I used toasted sesame oil)
-1/3 C chopped fresh cilantro (I probably did more)
-3/4 C chopped pecans (I toasted them)
-(I added some fresh minced garlic)

Mix it all together and let set at room temp for an hour to allow the flavors to blend. I bet this would even taste better as a left over!

I get a weekly email recipe from SplendidTable.org. Our NPR radio station no longer carries this program, but I used to listen to it all the time. I've gotten great recipes from Lynne Rossetto Kasper. I also have a recipe box at FoodNetwork.com - I can add recipes to this box, which is a great place to have things organized. But now I'm doing this blog in the hopes of organizing my kitchen escapades!

Wednesday, August 4, 2010

Corn Masa/Hominy, etc

You can buy fresh corn masa at a Mexican grocer for making corn tortillas, tamales ... Way better than the corn masa flour from the grocery store (which I usually use for tortillas and thickening a chili or mexican soup). I found a recipe for making my own. I then freeze it in 1lb quantity in freezer bags.

When seeing the recipe you might ask "dried field corn?", "and where would I get that?", "and why do you have that?" I've not looked in a store for it, so don't know if it's in a bin like other grains. I get it in 25 or 50# bags. I have an electric grain grinder - a NutriMill - and have been grinding my own flours for about thirty years. When my kids were little and bread was one thing they'd definitely eat, I wanted it to be the best possible. Most store-bought flours are devoid of nutrients, primarily starch, and if whole grained, rancid. Take wheat. Twenty-six some known nutrients, stripped, and 5 or 6 put back! So in my garage I've got whole wheat, oats, rye, corn, blue corn, barley, quinoa, amaranth ... I can grind beans too if I want. A sweeter corn for cornbreads is actually ground popcorn - a smaller kernel than field corn.

CORN MASA
Wash 10C dried field corn
10C water
2Tb lime powder (in canning section for making crisp pickles)(CaO)

Bring to a full boil and simmer for several hours. Add additional water if needed. You want them tender, but not too soft. You want the water cooked in as much as possible. Drain.

This mixture is put through a meat grinder, as fine as can get it, for making tortillas and tamales. It's got a wholeness to it that differs from using the dried masa flour, so prepare yourself. It's good. My Zucchini Boat post mentioned me making Pozole with it and adding it to Chili.

For tortillas, use 5 cups, 1 1/2 tsp salt, and approximately 1 cup warm water. You don't want the dough too soft. With fresh masa, you might not need much water at all. Chill dough several hours. Form into balls about 1 1/2-2" diameter and press in a tortilla press between plastic wrap or waxed paper for a 6" tortilla. Grill on a hot cast-iron griddle or skillet.

If you get some fresh roasted anaheim or poblano chilies, cut them in strips and cook up with some cream. This is the ultimate on home-made tortillas. I crave fish tacos. Or fry these crisp and make bean tostadas. For about 16-18 tamales you'd use 1lb coarse ground fresh masa, 1 tsp salt, (some use 1tsp baking powder), 1/2C rich-tasting lard, and enough water to make mushy. All tamales use a fat source. Traditionally, the best, is roasted lard, not the white lard sold in stores. Don't freak out, but I use bacon fat. I pour it off my microwave bacon cooking tray into a can and store it for Mexican cooking. You can use butter. I've not tried oil.

What's being used today - and before getting tamales at farmer's markets, I ask - I don't want them made with shortening!!!!! I read labels! I avoid (along with high fructose corn syrup) PARTIALLY HYDROGENATED anything! It's just a step away from plastic! It's poison. Our body does not know what to do with it, or high fructose corn syrup, so it runs about the body looking for something to latch on to and ends up creating weird cells. That's what can bring on heart disease, or cancer, or ...

Yogurt

I made yogurt the other day. I've been making yogurt for years. I bought my yogurt maker at a second-hand store and it makes a 1/2 gallon milk quantity of yogurt.

YOGURT
Here is the recipe that consistently works for me-
-Heat the milk to about 180 degrees. I do this in the microwave in a Pyrex glass bowl. Then let it cool down to around 100 degrees.
-Mix in the starter, about 6 Tb, and pour into jars in yogurt maker.
-start checking for firmness in about 4 hours

Yogurt Starter
Hmmmm ... starter .... It used to be you could buy almost any plain yogurt in the store to use as a starter. But today, most yogurts have additives which seem to inhibit it's thickening. Some additives, like gelatin, will work, but it seems to take longer for the milk to firm. Your best bet is yogurt in health food stores - and you want live cultures. Read the labels. You can also find powdered starters, usually in a refrigerated section. If you use the powdered starter just follow the directions.

Once you make yogurt, you can use your own homemade yogurt for starter. I always plug in my yogurt maker, with the empty jars in it, when I begin the yogurt making process for it to start heating. I'll put my yogurt starter in it at this time too, in one of the jars, to take off its chill.

When the starter is mixed into the cooled-down milk, pour the mixture into the jars in the yogurt maker, place the cover on the yogurt maker. Start checking after a few hours. Mine usually sets in 3-4 hours. When I start a fresh batch with the powdered starter it takes longer. Look for a slight firmness of the milk. It will firm up a bit more in the refrigerator. The shorter the time, the sweeter it is. If you forget and let it incubate longer, it gets tart, but still tastes better than store-bought yogurt.

I love the taste of plain homemade yogurt. You can add jam, fruit, frozen juice concentrate, maple syrup, wheat germ, ground flax seed ... whatever you like. I've already posted a Yogurt Ice Cream recipe. Whenever a recipe calls for sour cream or mayonnaise I'll sometimes use yogurt. It can also be substituted for sour milk or buttermilk.

You want the good bacteria that yogurt provides - a 'live', active yogurt with its acidophilus, thermophilus, and bulgaricus. 'Friendly' bacteria helps aid food digestion. Yogurt is a predigested form of milk and it tends to 'crowd out' bacteria associated with indigestion. Lactose intolerant people can often eat yogurt. I've made yogurt with Lactose Free Milk, and it works - if you are super lactose intolerant.

When I was a kid, I was sick and on antibiotics a lot. My homeopathic grandmother told my mother to keep feeding me yogurt. "Thank you Grandma." Antibiotics kill the good bacteria along with the bad. Yogurt boosts the immune system and has a natural antibiotic effect.

When in Wisconsin we used to visit Monte's aunt and uncle who lived on a dairy farm. The yogurt Aunt Ruby made from their fresh milk she called "filabunk" (sp?). I brought home some starter from her and used it for awhile. All cultured things are their own starters. Buttermilk nowadays is no longer the by-product of butter making, but cultured. Sour cream, Kefir ... wine ... all have their own cultures, like differing yeasts.

Now to go mix me up some yogurt, dried sprouted flax seeds, and fruit - my second breakfast!

Zucchini Boats

'Tis zucchini season. What comes to your mind when you think "zucchini". I know ... there's SO many zucchini jokes! Several dishes I like made with zucchini are what I think of. I've posted a Mexican Zucchini Salad recipe already. In my old blog I posted a Zucchini, Potato, Onion soup - and I'll post it here some day. It's a great food for zucchini use that freezes well and we enjoy it all year round. Guests have liked the soup too. I don't plant TOO many plants, and then try and pick them when small, like 5". They are another veggie I like to grill slices of - good any way, but think of sandwiches. Thin zucchini slices are even good in lasanga, replacing some or all of the pasta. And then there's always a quick saute/stir-fry. Lemon juice, good tasting olive oil, and parmesan are my most favorite veggie flavorings.


I'm currently freezing 1/4-1/2" unblanched slices. Simply put on cookie sheet till frozen and bag up. These are good in stir-fry, or breaded and skillet fried. I've dehydrated slices too. All veggie flavors are accentuated when dried and make very good snacks (maybe I'll pull out my dehydrator this year). One year I tried freezing grated zucchini and didn't really use it much. But Heather often made a bunch of zucchini bread we'd freeze, and I make sourdough zucchini bread too. So that's another food to pull from the freezer. Monte loves to toast zucchini or banana bread. His latest bite he had me taste with my eyes closed was some crushed pineapple on a toasted banana or zucchini bread slice. I could not guess what it was!!! It was very good. These toasted warm slices are good with a thin slice of cheese. Don't forget about zucchini relish or pickle possibilities too.


Another favorite zucchini dish that comes instantly to my mind is what I call ...

ZUCCHINI BOATS
I'll give you the recipe's proportions and then you can adjust for however many you want to make.


3-4  5-6" Zucchini, ends removed, nuke about 7 minutes, turning and rearranging, slice in half and scoop out centers (sometimes if not seedy, I add this into the filling mixture)
Chop and mix-
1 tomato
1/4C almonds
1Tb parsley (double if fresh)
small bit of onion (like 1-2Tb)
(I did chives)
1/2 tsp salt seasoning


You're going to microwave again (or sometimes I'll toast tops in toaster oven) so put zucchini in a glass dish or plate. Brush with some melted butter or olive oil. Spoon filling into zucchini shells.


Mix 1Tb butter or olive oil with
1/4C cracker or bread crumbs
(I like adding in some grated parmesan)

Sprinkle on top and press in a bit
Heat uncovered 2-3 minutes.


There's so many possibilities for fillings! Could add potatoes. I added basil, garlic, and mozzarella for this meal. Corn, chipotle chilies, black beans and cilantro. Curry powder, currants, grd meat, and yogurt. Tomatoes, mango and parsley ...


I had some gals here for a felting class and we had a fresh garden salad and a small bowl of chili I'd made and pulled from the freezer. They really liked the corn chunks in it - not typical corn. I'd gotten the idea from making Pozole: Pork and Hominy. Pozole is a bit bland, so I make it moreso a chili. In Arizona I made it using the fresh made cooked field corn. I think I'll do a post about it.


Well ... enjoy zucchini!

Monday, August 2, 2010

Grilled Salad

I'm a gal who LOVES grilling! And I love grilled salads. Sometimes when preheating the grill, I'll often look in my fridge's veggie drawers to see what I might grill. And then too, with summer's produce, there's great fresh grilling items.

I was going to grill some ground turkey patties. I mixed in some olive oil and seasoning and shaped them into patties. What did I find to grill with them? Two portobello mushrooms, and eggplant, pepper, and onion. Sometimes I'll cut these up, using baby bella mushrooms instead of the large (the large are like "meat" and so good, like a burger themselves!). I'll marinate the cut up veggies in an italian salad dressing mixture. These are better cooked in a grill basket, and I like these served over rice.

Most times when grilling the sliced veggies, rather than messing with oil flare-ups, I grill them as is. Then put on a plate, and then drizzle them with good tasting olive oil and lemon juice and season. These, even left over, are great in sandwiches.

I put fresh picked salad greens, chives, basil, sliced tomato and avacado on my plate. I ended up cutting it all up, greens and grilled stuff, added some Newman's Italian salad dressing and feta cheese. Mmmmmm.....

And then there's my current grilling atmosphere: blooming Jackmani deep purple clematis, Salvia's May Night, baby's breath, Russian Sage, Roses, Negro hollyhocks, nasturtiums, daylilies, regular lilies, delphiniums, kiwi and grape vines. There's my bird feeders, birdbath, and if you look close on the left center, I captured a hummingbird.

Saturday, July 31, 2010

Harvesting Peas, etc

My sugar snap peas have been beautiful this year, the best ever. I planted them early this year for the first time - my veggie garden just happened to be ready early this year. Timing: weather cooperating and husband/son cooperating. The compost piles were screened and piled for me to distribute. We had manure ready. And then a beautiful day. So I tilled, planned my gardening layout, and planted lettuce, spinach, kale, greens, radishes, carrots, and onions. I say early for me, but really not early according to the books. Those things are cooler tolerant plants. Then a visiting friend said my climate is good for those veggies - cuz, if you haven't noticed, we're in the middle of summer, and in most places these veggies would be fried. But then my timing between frosts is typically 90 days. And that's why I can't grow some HOT weather veggies - it's why most of my tomatoes are in walls-of-water, and I might get a couple peppers before frost.

Monte decided to help me freeze the peas by picking them. I froze 3 lbs. Sugar snap peas give you pea choices: eat them like snow peas, in the pods, or let them get large and shell the fresh peas. I thought I'd shell these, so I'd left them. Monte said, "No. Let's have them for stir frying over winter." AND I really don't like shelling peas. I like to do it for an occasional meal, but not for doing a bunch for freezing.

FREEZING SUGAR SNAP PEAS
Either boil or steam blanch for 3 minutes 1lb of peas at a time (I didn't wash them or anything, just removed blossom ends).
Cool quickly by either very cold water (which our mountain tap water is - I often need a bit of warm water running too if I'm washing much, like lots of spinach, cuz our water freezes my hands!) or an ice water bath.
Drain and pat dry on a towel.
Distribute on a tray and freeze.
When frozen solid, pack in a freezer bag.

These frozen do not retain their crisp texture. They could be removed from the freezer, cut in bite-size pieces, and added to a salad a few minutes before serving. We typically use them in stir-fry: slightly sauteing veggies.

Now for the rest of the story ... Monte often hates to get rid of good stuff. Just like my baby veggie starts from the greenhouse. He made new planting spots for extra kale, broccoli, etc this year that I had so much extra of (I always have extra and he just happened to be around this year helping). I tried to tell him the price of seeds - like 30 plants - is the price of buying a 6-pack of the veggie at the nursery. So we can throw them in the compost. I know, it is hard even for me. Some years I've frozen 30+lbs of broccoli, and I get tired of kale! So we had this leftover water we'd boiled the peas in ...

Monte loved the taste of this water and wouldn't let me throw it out. It's in a large jar in the refrigerator. When Dawson came home from his mountain bike ride, Monte told him to try the "Pea tea"! The next morning Monte tried it cold saying it would be better sweetened, thus, "sweet pea tea"!!!! ;-P

Our table grapes in the greenhouse are almost ripe. This year there's probably a hundred clusters! - some hanging down at head level and Monte ties up higher, since I'm often busy doing my textile art dyeing in there. I called them table grapes differentiating them from wine grapes. I used to trim them back hard like you have to if you want a lot of wine grapes. This process did not give us grapes, so I had to research. Now I don't trim them, but for cutting back the too long ends wanting to take over the greenhouse. I just bang down the dead leaves in January or February.

Raspberries are now producing. Tho I've now planted raspberries, everbearing ... and we'll see how they do. The raspberries we've got are wild. But they're growing in two of my flowerbeds. They are my oldest flower beds and Monte had brought dirt up from the woods by some springs (that's why we called our road Singing Springs Lane). The raspberries came from that dirt. They try and take over the beds. I do pull out a bunch periodically and last year I cut them all back in the spring. I thought our wild variety were everbearing. But no. We didn't get any raspberries that year. Everbearing bear on current year branches and bear throughout the growing season off and on. Others on older canes. I don't mind them mixed in with the flowers. My gardening style is 'cottage' and I've got veggies and fruit co-mingled with perennials.

Tuesday, July 20, 2010

Yogurt Ice Cream

Whenever Monte and me are in Ft Collins Colorado, visiting our son Travis, wife Sarah, and now little Emery, we always want to visit a family operated Yogurt Ice Cream place. They sell by the weight and there's lots of flavors and topping choices. The mechanism instantly freezes fresh yogurt, and it's not too sweet (unless you add tons of sweet topping). So I got to thinking ...

YOGURT ICE CREAM
Why not make our own yogurt ice cream. I make yogurt all the time. So with the last making, before even refrigerating it, I mixed
- 4 cups of the yogurt with
- 3/4 cup of sugar till it dissolved and refrigerated it till ready to make ice cream
- (I suppose a bit of vanilla flavoring would be good too)

For years we had a hand-crank ice cream maker - not the kind needing ice and salt - but an insert you keep in the freezer. We still have it for an extra, but it doesn't work as well (dented or something for an improper fit). Now we still have one with an insert for the freezer, but it's electric. While the guys were still enjoying sitting on the deck talking and watching the birds, and I was putting away pizza and salad makings, I dumped the yogurt mixture into the machine and let it run till it was frozen thick. We ate it along with the fresh strawberry grilled dessert pizza.

Our favorite frozen desserts have been pureed fruits - like mango and lime juice. Last year we did some with our garden's currents and greenhouse grapes. Lazy me no longer likes to make up the cooked ice cream bases. Last night's yogurt ice cream was fantastic! We'll be doing it all the time now. Monte often likes to cook up older fruit sitting about and old jam jar bottoms into what he calls a Swedish word for a fruit sauce- 'crem'. This would be good on the yogurt ice cream. The next time I make this I'm going to try substituting the sugar with 1/2 the amount using Agave Nectar.

Freezing Produce

A friend in Florida posted on Facebook about putting up peaches, commenting about all the work blanching to remove skin, and slicing. I commented on what I've done now for years, and thought I'd post some comments here.

First off! ... I've never peeled my fruit, whether canning, freezing, or drying. I figure that's where the majority of the nutrients are. The books say to, but after 30 years, we and guests are still very much alive and well! I suppose tho, that putting tomatoes thru either my hand cranked berry press or my Bosch one, the peel along with the seeds get eliminated, and too with apple sauce and pear sauce. But beyond those types of things, I don't work at removing the skin. Call me lazy. I like pies and cobbler, etc with fruit skins in the equation. When we'd eat canned peaches, the skins often fell off anyway, but in eating them they'd be full of flavor.

I don't can anymore. Canning loses 40% of produce's nutrients. Freezing and Drying only loses 15%. If I were to still can anything, it would be tomatoes, but with the two of us, and Costco having organic cases, and my garden doesn't produce that much of tomatoes (our 1st frost is early to mid September - so I pull out tomato plants onto a tarp and pull the tarp into the garage and pick off for eating the ripe tomatoes on into November). The best book for these techniques (tho they still peel stuff) is the classic Stocking Up. I love all the Rodale Press books (tho it may not be published by them now), having learned so much from them. Mr Rodale in the 70's was a maverick for health when American culture was moving into modern processed foods, and poor agricultural practices (A great book on the story of food is The Omnivor's Dilemma - I like all of Michael Pollan's books - I'm currently reading his older book Second Nature).

I've been freezing peaches whole now for quite some time. Since I don't cook a ton of desserts, we use them mostly "fresh" on granola/oatmeal/cereal, mushing on toast, frozen yogurt, in a smoothy ... Just take out however many peaches you want. If you don't want the skin, it slips right off. Slice and use.

Today, since it's cooled off quite a bit with cloud cover and forecasted rain, I'm going to be pulling up all the volunteer kale I let grow in my kitchen garden. It's been helping shade the garden soil all over the garden, so it doesn't dry out so fast, but it's now needing to be pulled out. I'm going to be freezing up a bunch.

Some veggies need to be blanched before freezing. I've not blanched corn in years since an old-timer told me she never blanches hers. But the Stocking Up book has done studies on testing produce's nutrients over time and found that most veggies hold nutrients better if blanched a bit. I freeze a lot of kale and spinach every year (and I get plenty of broccoli, cauliflower, and beans to freeze too). I like pulling out a little bag of kale or spinach, chop it up and thro in spaghetti/lasanga sauces, stews and chilis, or even just saute up a bit and put on a bit of lemon juice and parmesan and eat. Kale has more vitamin C than does citrus.

Grilled Corn and Pesto Pizza

Monte's geology partner from Arizona flew in yesterday and I echoed grilled pizza from a previous post. But I tried some new things, learning more. We know Stan says he likes a pizza with anchovies, artichoke hearts, feta cheese, jalepenos, olives, and hot sausage. I'd have to try each of those things individually to test, but the pizza was too salty. I think the biggest culprit was the chorizo sausage I'd pulled from the freezer and crumbled and browned. I used it on another pizza with mushrooms and onions and mozzarella and that one was too salty too. The other night's pizzas were not too salty at all and all of the combos were good. In the future I'd just brown up ground meat and season it myself.

The best pizza last night was one I spread with pesto sauce, instead of the spaghetti sauce. I make up pesto from fresh picked basil every year and freeze, without parmesan, adding in fresh parmesan when using the pesto. Then I tossed on chopped tomato, mozzarella and parmesan cheese.

I did do a dessert pizza - good flavors but didn't work. I'd mixed some orange liqueur and orange peel into mascarpone cheese and spread on the pizza, scattering sliced fresh strawberries. The cheese started melting off the pizza. So I think this one would work with more of a crust lip, or not spread it to the edges. Too, because of the cheese running, we let it sit quite awhile to let it cool and not be so runny. But I also mixed up some yogurt ice cream, which I'm going to post next, which was a hit!

GRILLED CORN
The grilled corn was a hit with Stan. In the summer I grill corn all the time. I've read lots of recipes, and even have my son Travis's opinion, on grilling corn, and have tried probably all the options. Since I don't want to baby the corn and brush on stuff, I leave it in the husk and let the husk char black, with occasional turning. BUT I do peel off some of the outer husk and cut off the tip of silk and husk close to the corn top. Some will tell you leaving the husk on just steams the corn. Removing some of the husk eliminates this complaint. By charring, the silk is no issue either. So it's the simplest method for me.

I mixed up a butter for the corn. Plan on 1 Tb butter per ear of corn. So I did -
4 ears of corn
4 Tb butter
1 large canned chipotle with some of it's adobo sauce (I always keep this in a jar in the fridge), chopped
(1 Tb mayo - 0ptional)
1 Tb chopped cilantro

Saturday, July 17, 2010

Grilled Pizza

I've been wanting to try grilled pizza and finally did last night. It was GREAT! ... and the guests, I wasn't planning on, loved it too. My last post mentioned our Velveteen House (from an old post on my old blog)(look at last post for the link). Well ... 5pm approached and as I was grinding wheat flour for the pizza dough, Dawson walked in, along with Tim and Gary ... and then Matt came, right when we were eating and pulled up another chair to the table on the deck ... and then while cleaning up, Splarah (Dawson's girlfriend) and Lizzie, scaring mommy and baby elk on their way up our road, ate more pizza, and said it was great ... and as I started, prior to this long sentence ... not expecting guests, but they arrived, I doubled the pizza dough and made 4 large pizzas instead of 2 on the grill. Monte picked salad greens from the kitchen garden, I'd made a dressing, and sitting on the deck eating and yacking with these young adults - a nice meal.

PIZZA DOUGH
-1C warm water
-1 tsp yeast
-pinch of sugar (I used succanat)
-1C flour
Slightly work the flour in, put the lid on the bowl (I'm using a Bosch Universal) and let sponge for 10 minutes, it should be bubbly.
Then add
-1 tsp salt
-(I added 1 TB of the Italian spice mix I mentioned in my last post)
-More flour (about 2 1/2C) till mixture starts cleaning the bowl and let knead for 6-10 minutes. (With WW flour it's best to have the dough still a bit tacky, not sticky, otherwise you've added too much flour and your bread will be dry. But this isn't as noticeable with pizza dough. I'll have to post bread making with fresh ground whole grain flour sometime. Detail bread making is in my cookbook.)

Turn on the grill to preheat.
While leaving the dough in the mixing dough to do some rising, get your pizza toppings ready. I had some natural pepperoni I'd removed from the freezer, a bit of ham left over, grated pepper jack, mozarella, and parmesan cheese, chopped some pineapple, sauted some onion and mushrooms, and opened a jar of spaghetti sauce. Also have a bowl of olive oil ready with a brush in it. And too, you need to oil the grill grate.

I divided the dough in 4ths and rolled them out on parchment paper. As you can see in the picture I stacked them on my pizza peal to take outside by the grill. Have everything ready by your grill. Have your salad and plates ready. Have a large serving board with pizza cutter ready. And beverage choice ready, sipping while cooking or waiting to eat.

Make sure the grill grate is clean and oil (I always keep a shallow bowl by my grill with a folded paper towel and oil). I kept one burner on high and the other side on medium. Put one pizza dough on the high burner. It'll start bubbling up. Check it for burning, but it seemed I left it there for 1-2 minutes, then turned it over onto the medium side. Immediately brush with olive oil and spread several spoonfuls of spaghetti sauce on and add toppings. Close the grill lid and cook till the cheese is melting - which seemed about 3-5 minutes. I pulled it onto the bread board for the guys cut it up while I began the next pizza.

You might ask, "You, Karey, are grilling? Don't guys usually do the grilling?" I always do the grilling. I love grilling. Monte never has grilled, unless helping me.

See the elk beyond our electric fence?

Friday, July 16, 2010

Monte's Tortilla Egg Sandwich

It's hot outside, which is unusual for our neck-of-the-woods. Lots of people are leaving Denver (supposed to be 100 tomorrow - we're always 10 degrees cooler) for the mountains for the weekend! I've been sitting out on our back deck at the umbrella table reading, drinking iced tea I sweeten with a few drops of Agave Nectar, which has a low glycemic index in comparison to sugar!. Until supper, Monte and me usually eat separate. Sometimes he goes directly into his office upon waking ... since he works at home, he's coming and going around the house and eating at varying times than me. While I was resetting the sprinkler for the veggie garden, he brought his creation out for me to take a bite of ... and proceeded to email Travis and Sarah and me his recipe, with a picture of the seasoning he used taken with his iPhone. So I just made it for my lunch and took a picture.

From the guests we had the other night we've got leftover flour tortillas. I think we primarily stay Costco members for their uncooked flour tortillas. I know ... some of you will say, "but you grind your own flour and make everything from scratch with it!". If I'm going to make tortillas from scratch, I'll do corn tortillas. We use these for our many guest meals and Tostada Egg (in my cookbook and I'll post here someday). So many high school and college kids end up around here (I have posts from my old blog called "Velveteen House" [-click that phrase if you want to read it]), especially over school breaks, I never know who might have spent the night till mid morning. And I often do Tostada Eggs when they're around - they like them, cut in wedges, dipped in salsa. And an easy on-the-go meal to grab.

TORTILLA EGG SANDWICH
-Heat small skillet for cooking one egg.
-Fold cooked flour tortilla and toast in toaster (watch closely).
-As Monte said, "break egg yoke and shape to fit half of a tortilla."
-Sprinkle on Chef Prudhommes' Magic Italian Seasoning (I get this from Costco too).
-Flip egg till desired doneness
-Spread a bit of mayo inside toasted tortilla
-Slip egg inside.
-Enjoy!

I did. Along with an avacado half with fresh sqeezed lime juice.

You'll see in the picture a fork. I didn't need the fork - cuz of course we pick it up to eat. But it reminded me of the many times we've had Norwegians here for geology meetings. Unless they copy us, they'd eat it with a fork and knife as they also do with sandwiches, and everything. Monte and me have gotten used to keeping our fork in our left hand for eating along with a knife in the right hand, as do Europeans.

Mexican Zucchini Salad

We had house guests: investors interested in Monte's swashbuckling geology. It was an all-of-a-sudden event, and one, the only one we knew, stayed the night. Our typical first meal for guests is Mexican and usually I'll grill stuffed poblanos (I'll post that recipe another time), but didn't do that this time. Since it was a quick throw-together we repeated our mexican chuck roast and radish salsa meal I recently posted about. I did a rhubarb crisp, already posted too, along with rhubarb-ade, and tea. I also made another favorite guests like - Mexican Zucchini Salad. (Monte told me I better take a picture of his plate - he always makes a great presentation of food!)

I have a cookbook from when we were first married, so thirty-five years old, that this recipe idea came from (idea... since I don't totally follow). When Travis got married, Monte and me catered the rehearsal dinner all the way to Ft Collins from our Evergreen home - a Mexican fiesta! This salad was one of the dishes well received.

MEXICAN ZUCCHINI SALAD
3 medium zucchini
1/2 tsp salt
Cut the zucchini in half lengthwise and again in 1/4" slices. In a bowl, salt these with the salt, toss to mix, then spread on several layers of paper towel to sit and drain for 30 minutes. Pat dry before adding to bowl mixture.

Combine in a bowl-
5 Tb vinegar (I like to mix some balsamic, red wine vinegar and maybe brown rice, apple cider, sherry vinegar - the recipe uses all white vinegar - how boring!)
2-3 cloves minced garlic (instead of recipe's 1 - I always do more garlic in recipes)
1/4 tsp dried thyme (use more of garden fresh thyme)
1/2C good tasting olive oil
1 can drained garbanzo beans
1/2C sliced olives
1/2C+ sliced green onions (I always do more green onions and love the green tops)
1 canned chipotle chili in adobo, seeded and minced (I always keep these in a jar, once a can is opened, and when I take out a chili I make sure to shove all the chilis into the adobo for better keeping)
1/2C crumbled queso anejo (which I don't usually have, so I use cows milk feta [we don't like goat feta - fresh goat milk and cheese is good, but something happens to it in the processing and time])

I'll make this a bit ahead 30 minutes to 4 hours, and occasionally stir for the flavors to marinate.

After supper, and a rain sprinkle, we walked around the gardens, enjoying the flowers, texture, and mountain air. I had them all eat a sweet cicely seed pod - an after dinner mint. The plant is behind my tarragon plant - both a type of licorice/anise flavor. Sweet Cicely is very ferny and mine has been reseeding (I think last year's moist summer did it) so I moved them about the garden this spring.

An artist friend, Sarah, and me made my Sculpy Dough herb labels last year. They are weathering just fine - I didn't know how they'd hold up. Garden twine holds them to bamboo poles.
Related Posts Plugin for WordPress, Blogger...